Archive for the ‘programming’ Category

ripgrep(rg)の検索結果をCotEditorで開いてタグジャンプ

火曜日, 2月 19th, 2019
[`evernote` not found]
Facebook にシェア

(2019年2月19日修正:macOS Mojaveでは外部のOSAXライブラリをサポートしなくなったため、satimageのライブラリを使わないように変更。正規表現のルーチンは、sed – Can’t figure out how to implement REGEX with AppleScript – Stack Overflowに掲載されていたものを使わせてもらった)

指定した文字列を含むテキストファイルを、特定のフォルダ内から検索。テキストエディタで検索結果を開き、該当ファイルの該当行を一発で開けるようにしてみました。
テキスト検索ツールとしてはripgrep、テキストエディタはCotEditor(macOS用)を使っています。

事前準備

ripgrepのインストール

Homebrewをすでに使っているなら、ターミナルから

brew install ripgrep

と入力するだけ。

テキストエディタCotEditorのインストール

CotEditorは、Mac App Storeからインストールできる。

ターミナルからCotEditorを起動できるようにする

CotEditorには「cot」というコマンドラインツールが用意されている。ターミナルから

ln -s /Applications/CotEditor.app/Contents/SharedSupport/bin/cot /usr/local/bin/cot

と入力してシンボリックリンクを作成する。

CotEditor用のスクリプトをインストール

下記のスクリプトを、macOS搭載の「AppleScriptエディタ」で入力して適当なファイル名を付け、CotEditorのスクリプトフォルダ(“~/Library/Application Scripts/com.coteditor.CotEditor”)に保存。私は「tagjump.@~j.scpt」という名前を付けた。

(※”@~”と付いているのは、command+option+jというショートカットキーでこのスクリプトを呼び出せるようにするため。詳しくはCotEditorのヘルプを参照)


use AppleScript version "2.4"
use scripting additions
use framework "Foundation"
tell application "CotEditor"
	if exists front document then
		tell front document
			
			-- get selection's positional data
			set {locLength, selectionLength} to range of selection
			set {locLines, selectionLines} to line range of selection
			set looseSelect to 0
			-- whole lines select
			if (selectionLines is greater than or equal to looseSelect as number) then
				set line range of selection to {locLines, selectionLines}
				set {locLength, selectionLength} to range of selection
			end if
			
			-- ignore last line break
			if contents of selection ends with "
" then set range of selection to {locLength, selectionLength - 1}
			set theSelection to contents of selection
		end tell
	end if
end tell

set regex to "^(/.+):([0-9]+):(.*)"
set aRes to re_match from theSelection against regex given replacement:"/usr/local/bin/cot $1 -l $2"
if aRes is not equal to {} then
	delay 0.2
	do shell script aRes
end if

on re_match against pattern from str given replacement:fmt
	set regex to current application's NSRegularExpression's ¬
		regularExpressionWithPattern:pattern ¬
			options:(current application's ¬
			NSRegularExpressionCaseInsensitive) ¬
			|error|:(missing value)
	
	(regex's stringByReplacingMatchesInString:str ¬
		options:0 range:{0, length of str} ¬
		withTemplate:fmt) ¬
		as text
end re_match

使い方

ターミナルからripgrepで検索を実行

ターミルから

rg -n -e 検索したいパターン 検索対象フォルダのフルパス | cot

と入力する。
フルパスを手入力するのは面倒くさいけど、Finderから対象フォルダをターミナルにドラッグ&ドロップすると簡単に入力できる。

検索結果がCotEditorで開かれる。
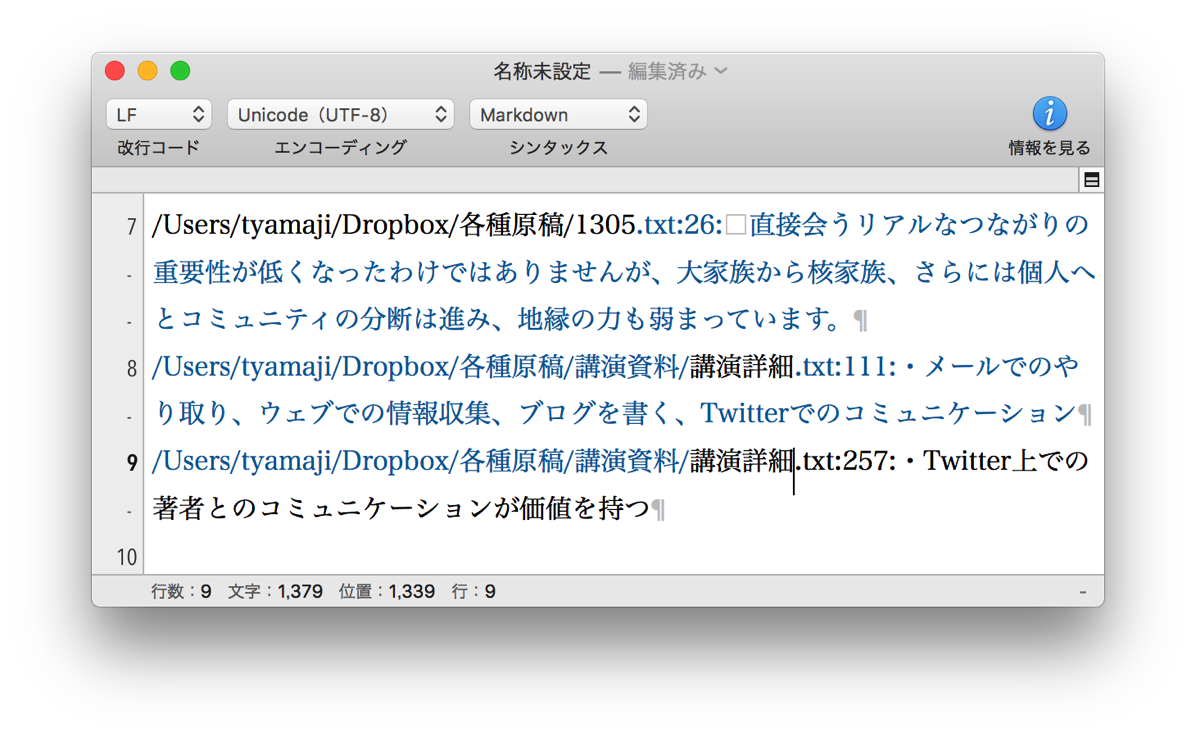
Ripgrep coteditor 1

CotEditor上からスクリプトを実行

開きたいファイル名のところにカーソルを移動し、スクリプトメニューから「tagjump.@~j.scpt」を実行(この場合は、command+option+jキーで実行できる)

該当ファイルの該当行がCotEditorで開かれる。

(2018/01/03追記)フルパスを書くのが面倒なら、例えば下記のようなシェルスクリプト(rgcot.sh)を書いておいて、「rgcot.sh 検索パターン」のように実行すると便利。この例では、カレントディレクトリ以下から検索パターンを検索し、結果をCotEditorで開く。

#!/bin/sh
abs_path=$(cd . && pwd)
rg -n -e $1 "$abs_path" | cot -n
iOS用Kindleアプリから、該当電子書籍のAmazon商品ページを開くスクリプト

火曜日, 12月 11th, 2018
[`evernote` not found]
Facebook にシェア

Appleの戦略のせいで、iOS用のKindleアプリから直接電子書籍を購入できなくて実に不便だ。マンガの続きの巻を読みたいと思っても、サンプルをダウンロードするか、ほしい物リストに追加するしかできなくて、実際に購入するにはSafariでいちいちAmazonのサイトにアクセスしないといけない。
そこで、Kindleアプリで読んでいる電子書籍の、Amazon商品ページをSafariで開くPythonスクリプトを書いてみた(スクリプトを実行するには、Pythonista 3が必要)。

■準備

①Pythonista 3上で下記のスクリプトを入力して、適当なファイル名を付けて保存。

import urllib.request
import re
import appex
from objc_util import *

def main():
    input_url = appex.get_url()
    if input_url == None:
        print("No URL")
    else:   
        headers = {
            'User-Agent': 'Mozilla/5.0 (Windows NT 6.1) AppleWebKit/537.36 (KHTML, like Gecko) Chrome/41.0.2228.0 Safari/537.36',
            }
        
        req = urllib.request.Request(input_url, None, headers)
        res = urllib.request.urlopen(req).geturl()
        
        regex = 'asin=([a-zA-Z0-9]+)'
        matchobj = re.search(regex, res)
        if matchobj:
            amazon_url= 'http://amazon.jp/dp/' +matchobj.group(1)
            UIApplication.sharedApplication()._openURL_(nsurl(amazon_url))

if __name__ == '__main__':
    main()

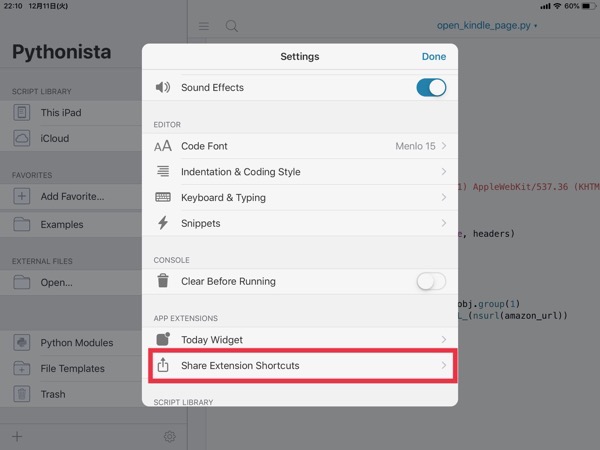
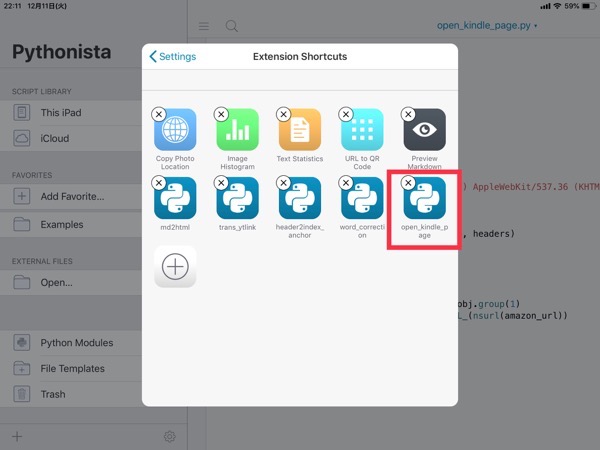
②Pythonista 3の”Settings”→”Share Extension Shortcuts”を選択。

IMG 1058

③「+」ボタンをタップして、先ほど保存したスクリプトを指定。

IMG 1059

■Kindleアプリからスクリプトを呼び出す

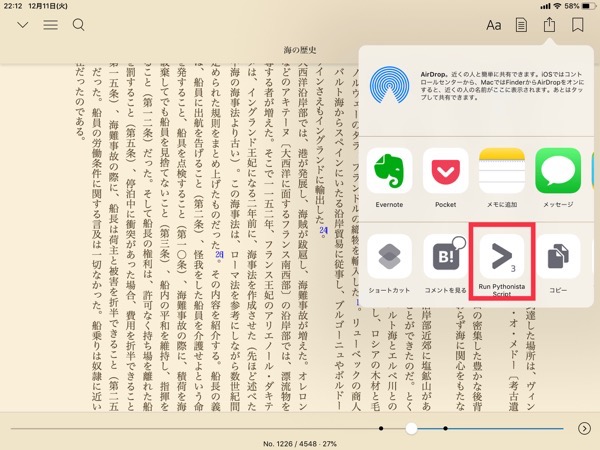
①Kindleアプリから、iOSの「共有」メニューを開き、「Run Pythonista Script」をタップ。
(Pythonista 3をインストールしているのにこの項目が表示されていない時は、共有メニューの「その他」から追加する)。

IMG 1060

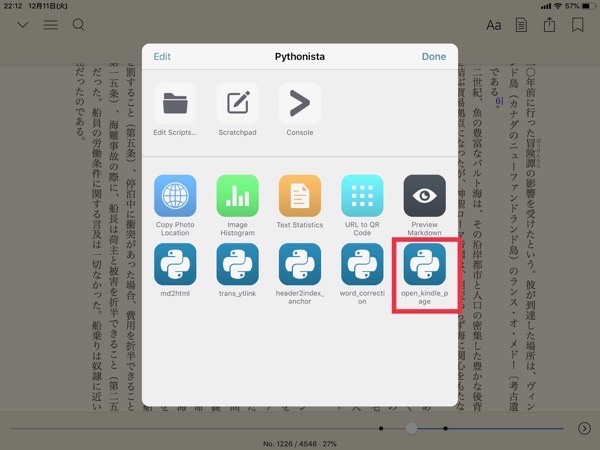
②先に用意したPythonista 3のスクリプトをタップ。

IMG 1061

③Amazonの商品ページが開く。

IMG 1062

Markdownの見出しレベルを変更するスクリプト(CotEditor用)

火曜日, 1月 9th, 2018
[`evernote` not found]
Facebook にシェア

CotEditorでMarkdownのテキストを書いている時、見出しレベル(#で始まる行)をショートカットキーで変更できると便利そうだと思ったので、スクリプトを書いてみました。
下記のスクリプトをmacOS標準のAppleScriptエディタで入力し、適当なファイル名を付けて、CotEditorのスクリプトフォルダに保存します。
ファイル名例に付いている「^@k」、「^@j」というのはショートカットキーの指定(CotEditorの機能)。ここでは、control+command+kで見出しレベルを下げる、control+command+jで上げるように設定しています。

見出しレベルを下げる(md_heading_down.^@k.applescript)

tell application "CotEditor"
   if exists front document then
      tell front document
            if coloring style is not in {"Markdown"} then
              quit
           end if
         
           -- get selection's positional data
         set {locLength, selectionLength} to range of selection
         set {locLines, selectionLines} to line range of selection
          set looseSelect to 0
           -- whole lines select
          if (selectionLines is greater than or equal to looseSelect as number) then
             set line range of selection to {locLines, selectionLines}
              set {locLength, selectionLength} to range of selection
         end if
         
           -- ignore last line break
          if contents of selection ends with "
" then set range of selection to {locLength, selectionLength - 1}
          
           -- get contents
            set theSelection to contents of selection
          if rich text 1 of theSelection is equal to "#" then
                set contents of selection to "#" & theSelection
            end if
     end tell
   end if
end tell

見出しレベルを上げる(md_heading_up.^@j.applescript)

tell application "CotEditor"
   if exists front document then
      tell front document
            if coloring style is not in {"Markdown"} then
              quit
           end if
         
           -- get selection's positional data
         set {locLength, selectionLength} to range of selection
         set {locLines, selectionLines} to line range of selection
          set looseSelect to 0
           -- whole lines select
          if (selectionLines is greater than or equal to looseSelect as number) then
             set line range of selection to {locLines, selectionLines}
              set {locLength, selectionLength} to range of selection
         end if
         
           -- ignore last line break
          if contents of selection ends with "
" then set range of selection to {locLength, selectionLength - 1}
          
           -- get contents
            set theSelection to contents of selection
          if (selectionLength ≥ 2) and (rich text 1 thru 2 of theSelection is equal to "##") then
              set contents of selection to rich text 2 thru -1 of theSelection
           end if
     end tell
   end if
end tell

Macでテープ起こし(文字起こし)

金曜日, 7月 12th, 2013
[`evernote` not found]
Facebook にシェア

講演やインタビューなどの録音を聞き、テキストを書き起こす作業を「文字起こし」や「テープ起こし」と言います。
文字起こしでは、キーボードから手を離さずに、録音データの一時停止・再生などを行えると、作業効率が格段に上がります。このためのツールとして、Windowsには「Okoshiyasu2」がありますが、Mac用には適当なものがなかったので同等の環境を実現するスクリプトを作りました。
このスクリプトにより、

  • テキストエディタやワープロを使いながら、音声や動画ファイルの再生・停止等の操作を行う
  • 前後に5秒程度スキップする
  • 再生速度を変える
  • 一時停止して、もう一度再生する時には、5秒程度前から再生する
  • といったことが可能になります。
    スクリプトは、キーボードユーティリティと呼ばれるアプリケーションで特定のキー操作に割り当てて使います。
    以下は、OS X 10.8 “Mountain Lion”での使用方法です。

    (さらに…)

    WordPressで作る多国語対応ブログ

    土曜日, 12月 26th, 2009
    [`evernote` not found]
    Facebook にシェア

    “The Magnesium Civilization”というブログでは、日本語と英語の両方で情報発信するために「qTranslate」というWordPress用プラグインを使っている。このプラグインを使うと、記事本文だけでなく、記事タイトルやその他の要素も簡単に多言語対応できてとても便利。
    ただqTranslateを使うと、表示しているカテゴリ内の記事一覧を行うウィジェット「Posts of Current Category」で、日本語と英語のタイトルがいっしょに表示されてしまい、見苦しいことになっていた。
    qTranslateのサポートフォーラムを見ると、プラグインのqTranslate対応方法がしっかり書かれている。文字列を表示する時に、Gettext関数を使うようにすればいいらしい。
    Posts of Current Categoryの場合は、ソースコードの終わり近くにある

    $post_title = htmlspecialchars(stripslashes($post->post_title));

    $post_title = htmlspecialchars(stripslashes(__($post->post_title)));

    に変更するだけで、qTranslate対応ができた。

    Mac OS Xの「サービス」から、bit.lyを呼びだしてURLを短縮

    月曜日, 11月 23rd, 2009
    [`evernote` not found]
    Facebook にシェア

    Mac OS Xには「サービス」というあまり知られていない機能がある。要するに、あるアプリから別のアプリの機能を呼び出すというものなんだけど、私もあまり使っていなかった。文字列を選択して、shift+command+LでGoogle検索するくらいか。
    ところが、Snow Leopardになって、このサービスが秘かにパワーアップされている。

    【コラム】OS X ハッキング! (341) 知られざるSnow Leopard (サービス編) | パソコン | マイコミジャーナル
    404 Blog Not Found:#osxtips – Scripters のための Automator入門

    ということは、Web上のサービスを使って、好きなようにテキストを加工することができる! 例えば、URLを選択して、bit.lyを呼びだして短縮URLに加工なんてことができそう!
    で、bit.lyを呼び出すRubyやPerlのサンプルを探して作ろうとしたけど、挫折orz。
    もうちょい探してみたら、すでに作っている人がいた。感謝。
    下記のページで公開されているワークフローを、ホームフォルダの「Library/Services」フォルダに入れれば、コンテクストメニューから呼び出せるようになる。

    Bit.ly URL shortening with Mac OS X Snow Leopard Services and Applescript

    service-bitly-1
    service-bitly-2
    元のワークフローは、短縮URLをクリップボードにコピーするようになっていたけど、私は元のテキストを置換するようにして使っている。
    メールにURLを貼り付ける時などに、とても便利。

    Snow Leopardで、辞書.appのデータもダイエット

    月曜日, 8月 31st, 2009
    [`evernote` not found]
    Facebook にシェア

    Mac OS X 10.6 “Snow Leopard”では、目立った新機能はないものの、10.5 “Leopard”に比べてさまざまな部分が最適化されている。OS自体の最適化もそうなのだが、地味なところもしっかり手が入っているのだ。
    その1つが、”Dictionary Development Kit”。Leopardでは「辞書アプリ」(辞書.app / Dictionary.app)用のデータをユーザー自身で作成できるようになった。Snow Leopard付属のDictionary Development Kitで辞書データを作成すると、Leopard上で作るより大幅にデータのサイズが小さくなる。Snow Leopardというより、Xcode 3.2というべきかな。

    以前公開した「英辞郎辞書変換スクリプト」で変換したXMLファイル(v110の英辞郎+略語郎)を、Snow LeopardのDictionary Development Kitにかけてみた。Leopardでは1.3GB(1,481,183,232バイト)だったデータが、Snow Leopardでは986.9MB(986,865,341バイト)に! データサイズが約2/3になっている。
    Snow Leopardでは、辞書データの構造を刷新したのかもしれない。辞書.appでは、Leopard上で作成したデータもそのまま使えるが、時間があればSnow Leopard上で作り直すことをお勧めする。
    ただし、辞書データの作成にかかる時間は大幅に長くなっているので、注意。上記の英辞郎データを変換したところ、makeするのに22時間以上もかかってしまった(初代MacBook)。

    OmniGraffleは、AppleScriptを使う人にとって神アプリかも

    日曜日, 6月 14th, 2009
    [`evernote` not found]
    Facebook にシェア

    B001FW0CP0テキストフレームに文字を流し込んで、それをビットマップ画像化するという作業をやる必要ができた。Adobe IllustratorをAppleScriptで制御したら簡単にできるんじゃないかと思ったのだが……。

    (さらに…)

    Evernoteに複数のファイルをまとめて登録する

    水曜日, 4月 22nd, 2009
    [`evernote` not found]
    Facebook にシェア

    先のエントリで、EvernoteにPDFを登録しておくとiPhoneからも検索できて便利と書いた。大量のファイルがある時にいちいち手作業で登録するのは面倒なので、簡単なAppleScriptを書いてみた。
    (2009年4月23日追記)→Finderでファイルを選択して、EvernoteにドロップするだけでOKでした……。ただし、フォルダアクションに関しては、依然として便利なはず。

    (2009年4月23日追記)
    ScanSnapから取り込んだデータ(名刺など)をEvernoteに登録するなら、フォルダアクションを使うことで作業はもっと楽になる。
    スクリプトエディタに下記のスクリプトを貼り付け、適当な名前を付けて「/Library/Scripts/Folder Action Scripts」もしくは「ホームフォルダ/Library/Scripts/Folder Action Scripts」に保存する。
    —-ここから—-

    on adding folder items to this_folder after receiving added_items
    tell application "Evernote"
    repeat with obj in added_items
    create note from file obj
    end repeat
    end tell
    end adding folder items to

    —-ここまで—-
    Finderで、ScanSnapで取り込んだファイルの保存先フォルダを右クリック。「フォルダアクションを使用」選択。もう一度右クリックして、「フォルダアクションを関連づける」を選択し、先ほど保存したスクリプトを指定する。このフォルダにファイルが追加されると、それがEvernoteに自動登録されるようになる。
    4行目の「create note from file obj」を「create note from file obj tags {“名刺”}」などとしておくと、タグを付けられる。タグを付けておくと、特定のタグだけを一覧表示できて便利だ。
    また、「create note from file obj notebook “名刺”」としておけば、「名刺」というノートブックに登録できる。タグを付けて整理するか、別のノートブックに登録するかはお好みで。

    オーディオファイルのチャプターを自動生成する

    日曜日, 12月 7th, 2008
    [`evernote` not found]
    Facebook にシェア

    Audibleで売られているオーディオブックにはチャプターが振られている。iTunesならshift+command+「←」「→」でチャプターを移動できるし、iPhone/iPod touchでもチャプターリストを表示させて移動可能だ。
    私はradioSHARK 2で長時間のラジオ番組を録音することが多い。こういう自分で作成したファイルに、指定した間隔でチャプターを付けられたら便利だろうなあと思って方法を探してみた。

    (さらに…)